
 With a relatively small time investment you can create a Twitter background that can align with you existing branding and help stand you out from the crowd.
Twitter does not supply an official guide on creating Twitter backgrounds so I have made a few notes from my personal experimentation.
In this simple tutorial I am going to give some of the key considerations for designing your own Twitter background and will make available a downloadable Photoshop template to get you started.
The options for creating a background vary, it’s a little like creating wallpaper for your computer, you can tile an image (repeats over and over) or you can create a solid image.
My personal preference is for the solid image so as to make use of the space available to create some branding impact. With the solid image you have to either fade to a colour that matches the background colour to ensure a visually seamless transition or make the image large enough to ensure it will fill the screen for those fortunate enough to have large monitors set to high resolution. For this I would suggest an image size of 1600x1200 pixels though be sure to optimise the image so file size does not become a problem.
Resolving the Resolution
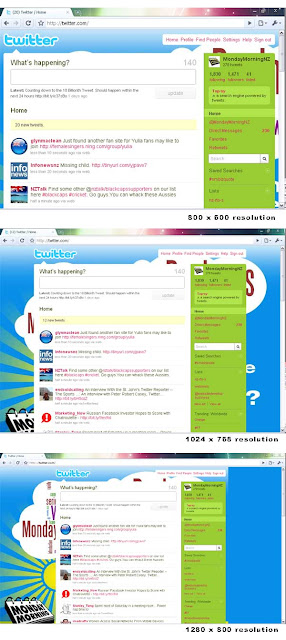
One of the main considerations when creating a Twitter background is that not all viewers have the same monitor size and resolution settings. The Twitter menu, logo and frame are floating over the background so they will centre on any screen. This will change the amount of viewable space either side of the main panel.
Some of the popular resolutions are: 800×600, 1024×768, 1280×800
The 1024x768 is what I would recommend that the design should be targeted for. The space at the left of the main twitter frame is the best for your visual branding the remainder is free to be filled with graphics or colour.

- Use Adobe Photoshop to open the downloadable template (link at bottom of this post)
- Fill the full 1600x1200 pixels with your design. If you want to use a smaller space be sure to fade out or edge with a matched background colour in the settings to ensure colour continuity.
- Use the 1024x768 pixel space to contain the most impact as this will be the most visible space to the majority of viewers.
- Use the “Viable Branding Space” shown in yellow on the left of the template space to create your branding or message impact (123x658 pixel area)
- Ensure that you optimise the image to ensure a fast download when viewed. (less that 100kb is recommended)
No comments:
Post a Comment